September 29, 2019
NaiveProxy on Debian 10 Server and Windows Client
0. Introduction
NaiveProxy is a censorship-resistance tool that mitigates the risks of traffic fingerprinting, active probing, and packet-length analysis. This post shows you how to install and configure NaiveProxy on a Debian 10 server with a Windows client.
1. Create Domain Name and VPS
Start by registering a domain name. We will use a free name from https://www.freenom.com, and the example domain name used in the rest of this post will be philo.cf.
Obtain a Debian 10 virtual private server (VPS). Some popular providers are Bandwagon Host (搬瓦工) and Google Cloud Platform (GCP), but you can use a different VPS provider if you prefer.
Note down the server's IP address. We will use as an example the IP address 188.188.188.188.
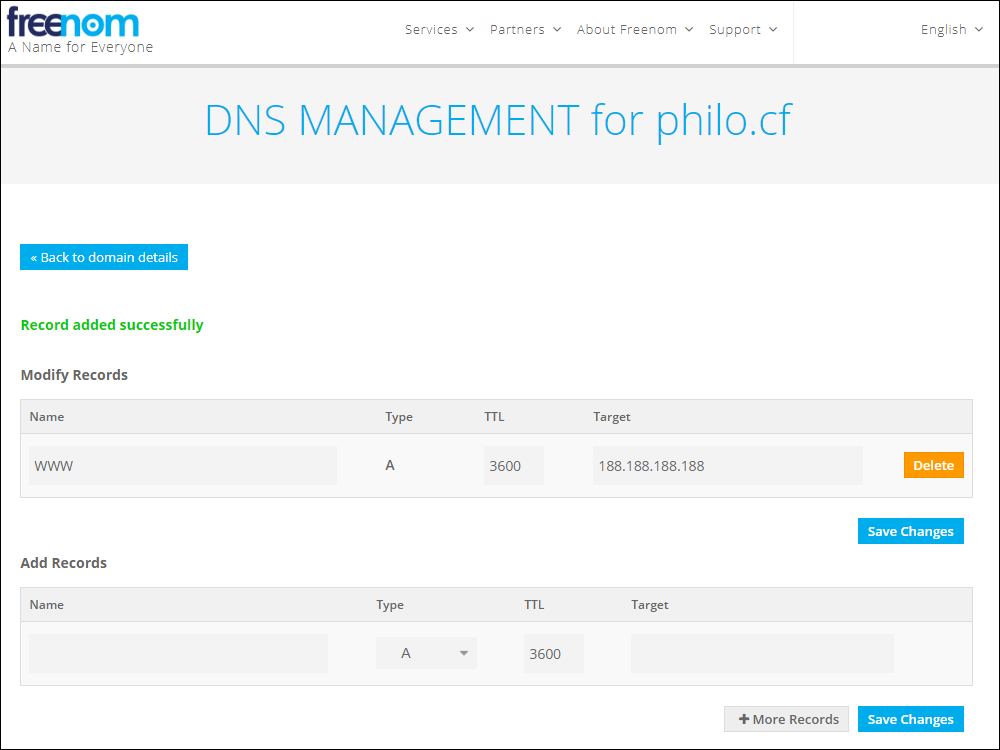
Back at your domain name registrar, which for us is https://www.freenom.com, add a DNS A record pointing from your server host name (e.g. www, type A, time-to-live 3600 seconds) to your server IP address (e.g. 188.188.188.188). Save these changes.
2. Tune Server
SSH into your server from a terminal emulator (from Linux or macOS) or a tool such as PuTTY, NetSarang XSHELL, or PowerShell (from Windows). If your DNS records have had time to propagate, you can use the server's hostname. For example:
ssh root@www.philo.cf
Otherwise, you must use the server's IP address. For example:
ssh root@188.188.188.188
Start by getting your server's existing software packages up to date:
apt update
apt upgrade
Change the password to something only you know:
passwd root
The Bottleneck Bandwidth and Round-trip propagation time (BBR) congestion control algorithm tracks a connection's delivery rate and round-trip time to offer higher throughput and lower queueing delays where there are network bottlenecks. BBR has been supported by Linux since kernel version 4.9. Since Debian 10 is based on Linux kernel 4.19, we can use it here. Create a local system control parameters file:
vi /etc/sysctl.d/local.conf
Press the i key on your computer keyboard to enter insert mode. Insert the lines that specify the BBR congestion control algorithm:
net.core.default_qdisc=fq

net.ipv4.tcp_congestion_control=bbr
Press the Esc key on your computer keyboard followed by :wq to write the file to disk and quit the editor. Activate these changes:
sysctl -p /etc/sysctl.d/local.conf
If your VPS hostname is not yet set to your chosen hostname, then set it now:
hostnamectl set-hostname www.philo.cf
Add the actual hostname to your /etc/hosts file.
vi /etc/hosts
Add a new line:
127.0.0.1 www.philo.cf
Write the file to disk, and quit the editor.
Reboot to make the hostname change effective:
reboot
You may need to wait several minutes for the server to fully reboot, otherwise you will get a Connection refused message. When the reboot is complete, log on to your server again:
ssh root@www.philo.cf
Verify that your tuning changes have persisted across reboots:
hostname
sysctl net.ipv4.tcp_congestion_control
3. Configure Firewall
Enable and start nftables:
apt install nftables

systemctl enable nftables

systemctl start nftables
nft list ruleset
You should see a table for inet filter, plus chains within it for input, forward, and output. If this table and its chains do not exist, then create them.
Add a rule to accept all related and established traffic:
nft add rule inet filter input ct state related,established counter accept
Add a rule to accept all loopback interface traffic:
nft add rule inet filter input iif lo counter accept
Whitelist your own IP address for access to SSH. You will need to substitute in the actual public IP address of your workstation. You can get your workstation's public IP address by opening a browser and visiting a site such as https://whatismyipaddress.com or https://www.ipip.net/ip.html. The command below uses an example workstation IP address of 11.22.33.44, which is represented in classless interdomain routing (CIDR) notation as 11.22.33.44/32. If you do not have a fixed IP address, but your IP address always comes from a certain block, you can substitute a CIDR range such as 11.22.00.00/16. In some cloud providers, you must also open port 22 in the VPS's Security Group.
nft add rule inet filter input tcp dport 22 ip saddr 11.22.33.44/32 counter accept
Also accept HTTP and HTTPS traffic:
nft add rule inet filter input tcp dport {80, 443} counter accept
Drop any unexpected traffic:
nft add rule inet filter input counter drop
Check that the rules now look as expected:
nft list ruleset
To persist these changes across reboots, save your rules to /etc/nftables.conf:
nft list ruleset > /etc/nftables.conf
4. Install Caddy
We are going to use Caddy for our web server. We opened the firewall for HTTP and HTTPS in the preceding step. Now install the Caddy web server, together with the http.forwardproxy plugin:
apt install curl
curl https://getcaddy.com | sudo bash -s personal http.forwardproxy
Give the Caddy binary the ability to bind to privileged ports as a non-root user:
setcap 'cap_net_bind_service=+ep' /usr/local/bin/caddy
Install the SystemD service unit file:
wget https://raw.githubusercontent.com/mholt/caddy/master/dist/init/linux-systemd/caddy.service

cp caddy.service /etc/systemd/system/

systemctl daemon-reload
Create the /etc/caddy, /etc/ssl/caddy, and /var/www/html directories:
mkdir /etc/caddy
mkdir /etc/ssl/caddy

chown -R root:www-data /etc/ssl/caddy

chmod 0770 /etc/ssl/caddy
mkdir -p /var/www/html
5. Generate Password
Configuring Caddy as a forward proxy requires a userid and password. You can generate a password with the command:
head /dev/urandom | tr -dc a-z0-9 | head -c 16 ; echo ''
You will get a result such as:
xp4ipwzwm41jkqp2
We will use xp4ipwzwm41jkqp2 as our password for the proxy server.
6. Configure Caddy
Edit the main Caddy configuration file:
vi /etc/caddy/Caddyfile
In the sample configuration below:
- Replace
www.philo.cfby your actual hostname - Replace
arcdetri@example.comby your own email address - Replace
arcdetriby your choice of userid for the proxy server - Replace
xp4ipwzwm41jkqp2by your choice of password for the proxy server
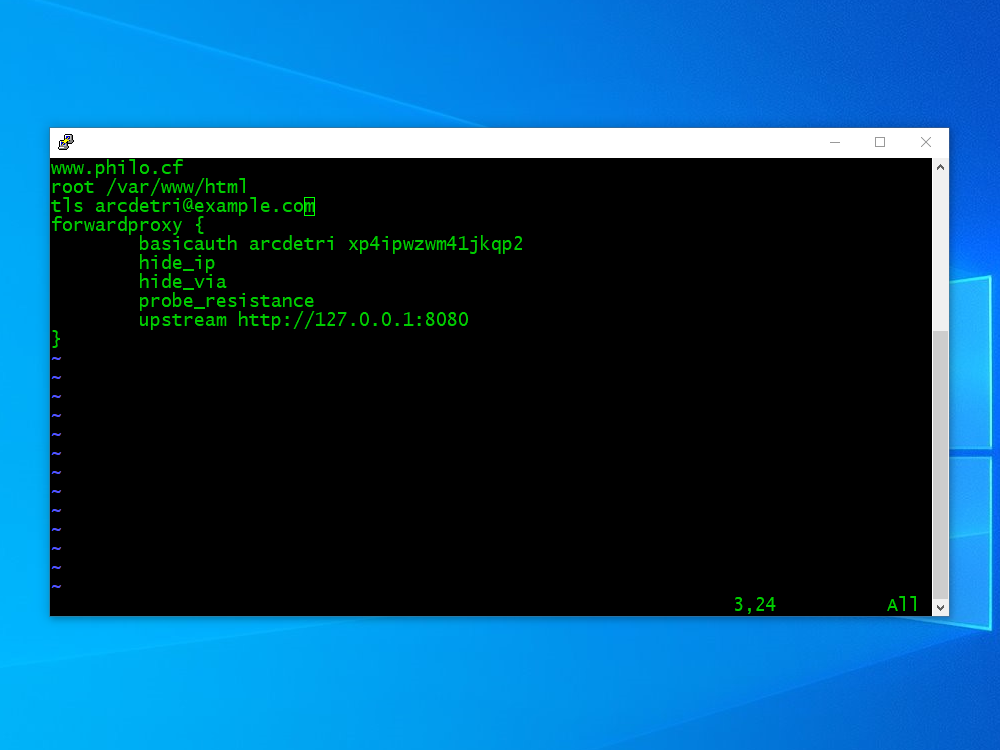
Here is the sample for you to modify:
www.philo.cf

root /var/www/html

tls arcdetri@example.com

forwardproxy {

  basicauth arcdetri xp4ipwzwm41jkqp2

  hide_ip

  hide_via

  probe_resistance

  upstream http://127.0.0.1:8080

}
When you have finished editing the configuration file, write the file to disk and quit the editor.
7. Start Caddy
Start Caddy:
systemctl enable caddy

systemctl start caddy
Verify that the service is running with the following command:
systemctl status caddy
You should see a status of active (running).
8. Add Web Content
Now create your web site content in the /var/www/html directory. For the sake of this post, we will use some sample content:
apt install zip unzip
wget https://github.com/arcdetri/sample-blog/archive/master.zip
unzip master.zip
cp -rf sample-blog-master/html/* /var/www/html/
When you have added your content, you can open a browser and visit the HTTPS version of your website to confirm that Caddy is working. In our example, this would be:
https://www.philo.cf
9. Install NaiveProxy
Install the dependency:
apt install libnss3
Determine the latest release by opening a browser on your workstation and visiting https://github.com/klzgrad/naiveproxy/releases. At the time of writing, the latest download for Linux is named naiveproxy-v77.0.3865.90-1-linux.tar.xz.
On your server, download the latest release:
wget https://github.com/klzgrad/naiveproxy/releases/download/v77.0.3865.90-1/naiveproxy-v77.0.3865.90-1-linux.tar.xz
Extract the archive:
apt install xz-utils

tar -xvf naiveproxy-v77.0.3865.90-1-linux.tar.xz
Change into the extracted directory:
cd naiveproxy-v77.0.3865.90-1-linux
Copy the binary into place:
cp naive /usr/local/bin
Create the SystemD service unit file:
vi /etc/systemd/system/naive.service
Insert contents as follows:
[Unit]

Description=NaiveProxy Server Service

After=network-online.target


[Service]

Type=simple

User=nobody

CapabilityBoundingSet=CAP_NET_BIND_SERVICE

ExecStart=/usr/local/bin/naive /etc/naive/config.json


[Install]

WantedBy=multi-user.target
Write the file to disk, and quit the editor.
Reload SystemD configuration:
systemctl daemon-reload
10. Configure NaiveProxy
Edit the NaiveProxy configuration file:
mkdir /etc/naive

vi /etc/naive/config.json
On the server, the configuration should listen on localhost port 8080, which is where Caddy will pass authenticated traffic:
{

  "listen": "http://127.0.0.1:8080",

  "padding": true

}
Write the file to disk, and quit the editor.
11. Start NaiveProxy
Start NaiveProxy:
systemctl enable naive

systemctl start naive
Verify that the service is running with the following command:
systemctl status naive
You should see a status of active (running).
12. Install NaiveProxy on Windows Client
Download and install the latest release of NaiveProxy for Windows from https://github.com/klzgrad/naiveproxy/releases/. At the time of writing, it is named naiveproxy-v77.0.3865.90-1-win-x64.zip..
Extract files from the downloaded naiveproxy-v77.0.3865.90-1-win-x64.zip file.
Go into the naiveproxy-v77.0.3865.90-1-win-x64 folder.
Edit the config.json file. In the sample configuration below:
- Replace
arcdetriby your choice of userid for the proxy server - Replace
xp4ipwzwm41jkqp2by your choice of password for the proxy server - Replace
www.philo.cfby your Caddy server's hostname
Here is the sample for you to modify:
{

  "listen": "socks://127.0.0.1:1080",

  "proxy": "https://arcdetri:xp4ipwzwm41jkqp2@www.philo.cf",

  "padding": true

}
When you have finished editing, write the file to disk, and quit the editor.
In Windows File Explorer, type cmd in the address bar to open a Windows command prompt. Start NaiveProxy running by entering the command:
naive config.json
Leave the Windows command prompt open, so that the NaiveProxy client continues to run.
13. Configure Firefox on Client
If you do not already have Firefox, then install it now from https://www.mozilla.org.
Launch Firefox.
- From the menu in the top right corner, select Options
- Scroll down to the bottom, and where you see Network Settings, click Settings
- Select Manual proxy configuration
- In SOCKS Host, put
127.0.0.1 - For Port, put
1080 - Check the radio button for SOCKS v5
- Check the box for Proxy DNS when using SOCKS v5
- Press OK to save your settings

14. Initial Test
Check that everything is working by visiting in Firefox:
You should see the IP address and location of your NaiveProxy server.
To turn off proxying, do Ctrl+c and close the Windows commmand prompt window where NaiveProxy is running, and set Firefox back to Use system proxy settings.